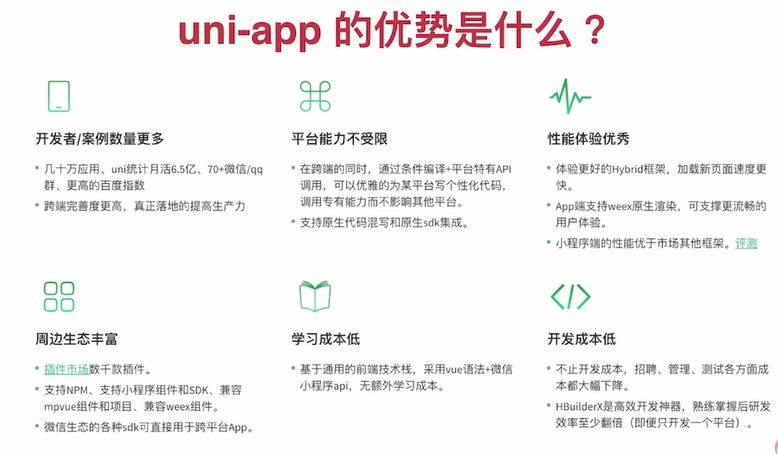
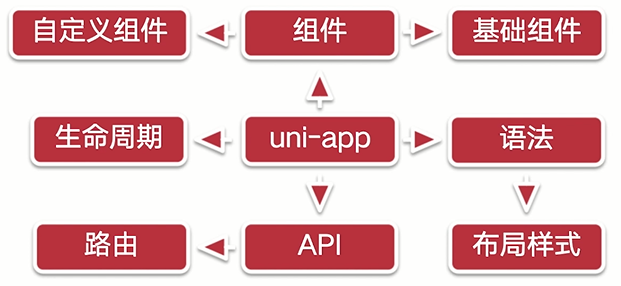
uni-app 是什么?
- 使用 Vue.js 技术开发所有前端应用的框架 [跨端框架]
- 编写一套代码的同时,可以把应用发布到多个平台

- pages/index/index.js
 /**
   * 页面的初始数据
   */
  data: {
    //1.数据绑定 <text>{{name}}</text>
    name: '张三',
    //2.条件判断 wx:if="{{is_ok}}"
    is_ok: false,
    //3.列表渲染 <view wx:for="{{ages}}" wx:for-item="age" wx:for-index="ids">{{age}}-{{ids}}</view>
    ages: [12, 13, 14, 15]
  },
uni-app 核心知识点概览
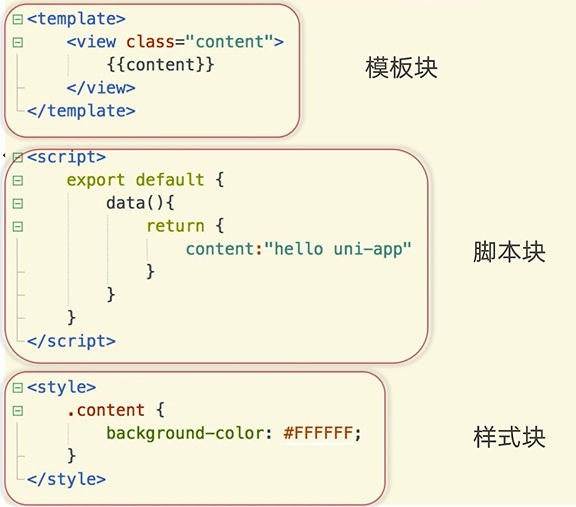
- 页面文件遵循 Vue 单文件组件(SFC)规范
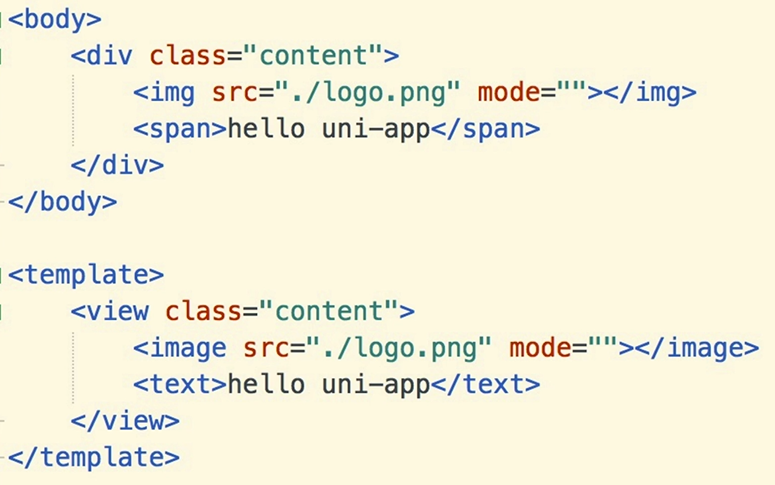
- 组件标签靠近小程序规范
-
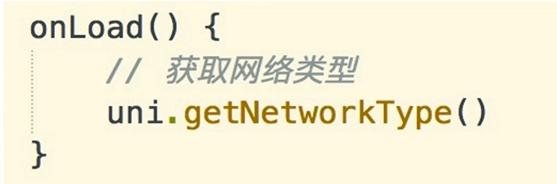
接口能力(JS API)靠近微信小程序规范
![]()
-
数据绑定及事件处理同 Vue.js 规范
-
为兼容多端运行,建议使用 flex 布局进行开发
-
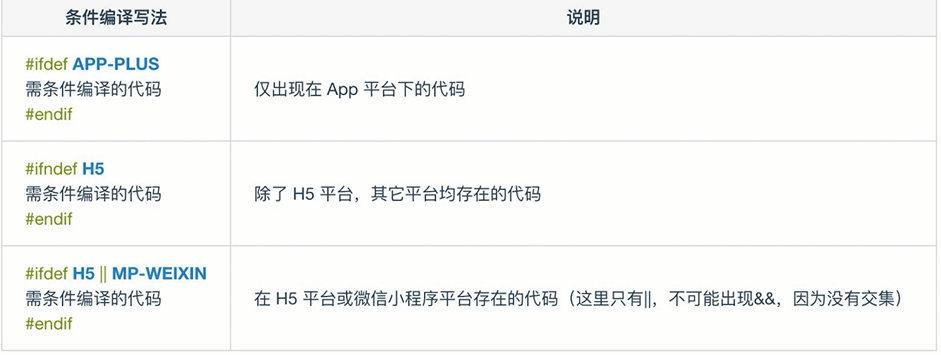
uni-app 特色
- 条件编译
- App 端的 Nvue 开发
- HTML5+
- uni-app 知识点
模板语法 数据绑定
<template>
    <view class="content" :class="className" @click="open">
        {{title}}
    </view>
</template>

<script>
    export default {
        //初始化数据方法
        data() {
            return {
                title: '修改值',
                className: 'active'
            }
        },
        onLoad() {
            setTimeout(() => {
                this.title = 'Hello'
            }, 2000)
        },
        methods: {
            open() {
                console.log('被点击了')
                this.title = '被点击了'
            },
        }
    }
</script>
条件判断
<template>
    <view>
        <view>
            <view v-if="show==='uni-app'">uni-app</view>
            <view v-else-if="show==='vue'">vue</view>
            <view v-else>html</view>
        </view>
        <button type="default" @click="open">点击</button>
    </view>
</template>

<script>
    export default {
        //初始化数据方法
        data() {
            return {
                show: true
            }
        },
        onLoad() {},
        methods: {
            open() {
                this.show = 'vue'
            },
        }
    }
</script>
列表渲染[通过数组来渲染我们的列表]
<!-- v-for item : 被迭代的数组元素的别名-->
<view v-for="(item,value) in arr">{{value+' : '+item}}</view>

return {
        arr: {
            name: 'Liming',
            age: 18,
            type: 'eat'
        }
    }
基础组件
- https://uniapp.dcloud.net.cn/component/view.html
- view => div
- text => span
<scroll-view class="height" scroll-y="true" @scroll="scroll">
        <view v-for="item in 100">{{item}}</view>
</scroll-view>

methods: {
    scroll(e) {
        //根据滚动输出的事件,可以给其设置固定的样式
        console.log(e)
    }
}
自定义组件 [重要,重中之重]
- btn 组件
<template>
    <view class="btn-box" :style="{color:color}" @click="onClick">
        <!-- 在组件中,接收页面中写到组件的内容 -->
        <slot></slot>
    </view>
</template>

<script>
    export default {
        props: {
            color: {
                type: String,
                default: '#000'
            }
        },
        data() {
            return {

            }
        },
        methods: {
            onClick() {
                console.log('我被点击了');
                this.$emit('change', this.color)
            }
        }
    }
</script>

<style>
    .btn-box {
        width: 200px;
        height: 100px;
        text-align: center;
        line-height: 100px;
        border: 1px red solid;
    }
</style>- index.vue
<template>
    <view>
        <btn color="blue" @change="change">我是一个按钮</btn>
    </view>
</template>

<script>
    import btn from '@/components/btn/btn.vue'
    export default {
        components: {
            btn
        },
        data() {
            return {
            }
        },
        methods: {
            change(e) {
                console.log('我是页面的事件,我返回了:' + e);
            }
        }
    }
</script>
api,条件编译与页面布局
<template>
    <view>
        <!-- 对应平台的代码 编译到对应的平台 MP-WEIXIN 微信小程序-->
        <!-- (#)ifndef 除了 H5,其他平台都存在其代码-->
        <!--#ifdef H5||APP-PLUS-->
        <btn color="blue" @change="change">我是一个按钮</btn>
        <!-- #endif -->
        <!-- 页面布局 -->
        <view class="content color">uni-app</view>
    </view>

</template>

<script>
    import btn from '@/components/btn/btn.vue'
    export default {
        components: {
            btn
        },
        data() {
            return {}
        },
        onLoad() {
            // #ifdef H5

            // #endif
            uni.getSystemInfo({
                success(res) {
                    console.log('success', res)
                },
                fail(err) {
                    console.log('fail', err);
                },
                complete(res) {
                    console.log('不管成功失败都会返回', res);
                }
            })
        },
        methods: {
            change(e) {
                console.log('我是页面的事件,我返回了:' + e);
            }
        }
    }
</script>
<style>
    @import './index.css';

    /* #ifdef H5*/
    /* #endif*/
    /* body */
    page {
        background-color: #007aff;
    }

    /* 尺寸单位 */
    .content {
        font-size: 12px;
    }
</style>
生命周期
- 应用生命周期
    //应用生命周期只能在 App.vue 里
    export default {
        // 应用 初始化完成触发一次,全局只触发一次
        onLaunch: function() {
            //登录 获取全局变量
            console.log('App Launch')
        },
        //应用启动的时候,或者从后台进入前台会触发
        onShow: function() {
            console.log('App Show')
        },
        //应用从前台进入后台触发
        onHide: function() {
            console.log('App Hide')
        }
}- 页面生命周期
    //监听页面加载[关注]
    onLoad() {
    },
    //监听页面的初次渲染完成[关注]
    onReady() {
    //如果渲染速度快,会在页面进入动画完成前触发
    },

    //监听页面显示
    onShow() {
    },
    //监听页面隐藏
    onHide() {
    },
    //监听页面卸载
    onUnload() {
    },
    methods: {
    open() {
        // redirectTo 关闭 index 页面
        uni.redirectTo({
        url: '../test-a/test-a'
    })
    }
}- 组件生命周期
    //在实例初始化之后,数据观测 (data observer) 和 event/watcher 事件配置之前被调用。
    beforeCreate() {
    console.log('component beforeCreate');
    },
    //实例创建完成之后立即调用,挂载阶段还没开始
    created() {
    console.log('component created');
    },
    //挂载到实例上去之后调用
    mounted() {
    console.log('component mounted');
    },
    //vue 实例销毁后调用
    destroyed() {
    console.log('component destroyed');
    }
uni-app 项目配置
- 微信小程序 [设置->安全设置->服务端口] HBuilderX[工具->设置->运行配置->配置路径]
- app 真机/模拟器 [数据线连接]
- h5
目录结构概述
- components - 自定义组件的目录
- pages - 页面存放目录
- static - 静态文件资源目录
- unpackage - 编译后的文件存放目录
- utils - 公用的工具类
- common - 公用的文件
- app.vue app.js
- main.js - 应用入口
- manifest.json - 项目配置
- pages.json - 页面配置
配置项目底部选项卡
- 在 onTabItemTap[生命周期]做些数据重新渲染的一些操作(类似页面重新刷新) onShow(){}每次页面进入都会触发
    //tabbar 点击触发
    onTabItemTap(e) {
    console.log(e);
},- pages.json
"tabBar": {
        "color": "#666",
        "selectedColor": "#ff5a5f",
        "borderStyle": "black",
        "list": [{
                "pagePath": "pages/index/index",
                "text": "首页",
                //本地图片, 大小 40kb,尺寸 建议 81*81px
                "iconPath": "static/home.png",
                "selectedIconPath": "static/home-active.png"
            },
            {
                "pagePath": "pages/about/about",
                "text": "关于",
                "iconPath": "static/follow.png",
                "selectedIconPath": "static/follow-active.png"
            },
            {
                "pagePath": "pages/my/my",
                "text": "我的",
                "iconPath": "static/my.png",
                "selectedIconPath": "static/my-active.png"
            }
        ]
    }
在 uni-app 中如何使用 sass
- 嵌套样式
- 使用变量, 用于同样的数值 $width:200rpx
<style lang="scss"></style>
.content{
//& 父级 .content.box
&.box{}
.logo{
width:$width;
}
.text-area{}
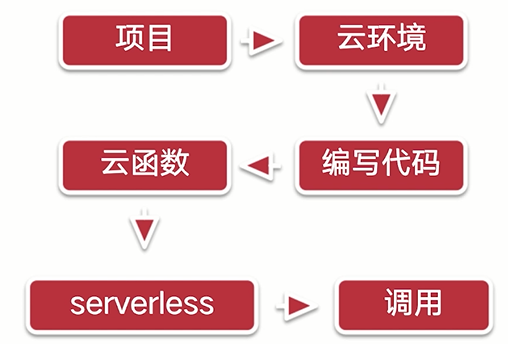
}认识 uniCloud 开发
-
用 JavaScript 开发前后台整体业务
-
开发成本大幅下降
-
只需专注于你的业务
-
非 H5,免域名使用服务器
-
对于敏捷性业务,完整不需要前后台分离
-
开发流程
![]()
-
构成
-
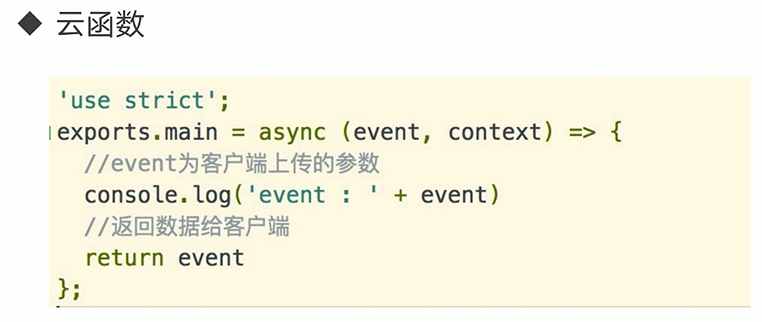
云函数
![]()
-
云数据库
![]()
-
-
云存储和 CDN
HBuilderX 中配置 uniCloud 环境
- 文件->新建->项目->启用 uniCloud->创建
- uniCloud 右键 云服务空间初始化向导 如果未实名认证,则先去实名认证,拍好身份证正反面照片,- > 点击新建->创建服务空间- >关联云服务空间
- 在 cloudfunctions 右键新建云函数,新云函数右键上传部署
使用 uniCloud web 控制台
- 云数据库:
- 右键 uniCloud - >打开 uniCloud web 控制台
- 一般情况,所有的数据增删改查,是通过客户端,云函数里面操作
- 云存储:
上传图片视频等 - 跨域配置
如果要用域名访问不报错,则在控制台跨域配置新增域名 192.168.101.7:8080
![]()

使用云函数
-
修改云函数,要上传部署,云函数在云端运行
-
pages/index/index.js
    open() {
        uniCloud.callFunction({
        name: "get_list",
        data: {
            name: 'LiMing',
            age: 18
        },
        success(res) {
            console.log(res);
        }
        })
}- get_list/index.js
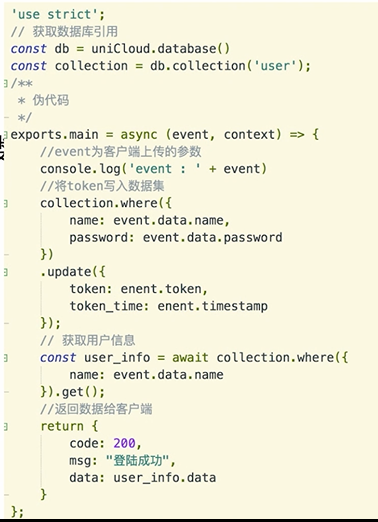
'use strict';
//运行在云端(服务器端)的函数
exports.main = async (event, context) => {
    //event 为客户端上传的参数
    //context 包含了调用信息和运行状态, 获取每次调用的上下文
    console.log('event : ', event)
    //返回数据给客户端
    return {
        code: 200,
        msg: event.name + '的年龄是:' + event.age,
        context
    }
};
云数据库的添加和删除
- 右键上传并运行
'use strict';
const db = uniCloud.database()
exports.main = async (event, context) => {
    const collection = db.collection('user')
    //删除
    const res = await collection.doc('63086cfe612f700001772e6f').remove()
    //await 同步接口
    /*添加记录
    let res = await collection.add([{
            name: 'vue'
        },
        {
            name: 'html',
            type: '前端'
        }
    ])
    console.log('数据插入:');*/
    console.log(JSON.stringify(res));
    return {}
};
数据库的更新和查找
//更新 update:只能更新存在的记录 set : 如果记录存在就更新,否则添加
    const res = await collection.doc('63086cfe612f700001772e6e').set({
        name: 'vue-test',
        type: '前端'
    })
//查询所有字段 const res = await collection.doc('63086cfe612f700001772e6e').get()
//模糊查询
const res = await collection.where({
name: event.name
}).get()
console.log(JSON.stringify(res));
return {
data: res.data,
code: 200,
msg: '查询成功'
}open() {
uniCloud.callFunction({
name: "get_list",
data: {
name: 'html'
},
success(res) {
console.log(res);
}
})
}使用云存储上传文件及删除文件
open() {
    let self = this
    //删除文件 客户端删除照片可能会报错 delete_file_no_permission 提示没有权限
    /*uniCloud.deleteFile({
        fileList: [
            'https://vkceyugu.cdn.bspapp.com/VKCEYUGU-5eb293ea-1514-429e-8b99-4226c1a28518/4594017d-a5b2-4651-9ccd-fc66b5d53f1d.png'
        ],
        success(res) {
            console.log(res);
        },
        fail(err) {
            console.log(err);
        }
    })*/
    //上传文件
    uni.chooseImage({
        count: 1,
        success(res) {
            const tempFilePath = res.tempFilePaths[0]
            const cloudPath = res.tempFiles[0].name
            console.log(cloudPath);
            //cloudPath 不可为空,必须传
            uniCloud.uploadFile({
                filePath: tempFilePath,
                cloudPath: cloudPath,
                success(res) {
                    console.log(res);
                    self.src = res.fileID
                },
                fail(err) {
                    console.log(err);
                }
            })
        },
        fail(err) {
            console.log(err);
        }
    })
}
项目初始化
- 新建项目->uniCloud->database->右键新建 db_init.json
- 右键初始化云数据库
{
    "list": { // 集合(表名)
        "data": [ // 数据
            {
                "name": "tom"
            },
            {
                "name": "LiMing"
            }//不要有逗号,否则会报错该文件不是一个有效的数据库初始化文件
        ]
    }
}- pages.json
"tabBar": {
    "color": "#666",
    "selectedColor": "#ff5a5f",
    "borderStyle": "black",
    "list": [{
    "pagePath": "pages/tabbar/index/index",
    "text": "首页",
    "iconPath": "static/home.png",
    "selectedIconPath": "static/home-active.png"
    }]
}
自定义导航栏
//导航栏取消
    "navigationStyle": "custom",
"navigationBarTitleText": "首页",- easyCom components/组件名/组件名.vue 局部引入
- 下面的代码就不用写
    import navbar from '@/components/navbar/navbar.vue'
    components: {
            navbar
    },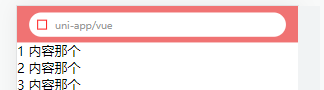
<template>
    <view class="navbar">
        <view class="navbar-fixed">
            <view class="navbar-search">
                <view class="navbar-search_icon"></view>
                <view class="navbar-search_text">uni-app/vue</view>
            </view>
        </view>
        <view style="height: 45px;"></view>
    </view>
</template>

<style lang="scss">
    .navbar {
        .navbar-fixed {
            position: fixed;
            top: 0;
            left: 0;
            z-index: 99;
            display: flex;
            justify-content: center;
            align-items: center;
            padding: 0 15px;
            width: 100%;
            height: 45px;
            background-color: $mk-base-color;
            box-sizing: border-box;

            .navbar-search {
                display: flex;
                align-items: center;
                padding: 0 10px;
                width: 100%;
                height: 30px;
                background-color: #fff;
                border-radius: 30px;

                .navbar-search_icon {
                    width: 10px;
                    height: 10px;
                    border: 1px red solid;
                    margin-right: 10px;
                }

                .navbar-search_text {
                    font-size: 12px;
                    color: #999;
                }
            }
        }
    }
</style>
导航栏适配小程序
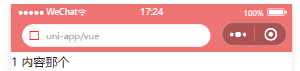
- navbar.vue
<template>
    <view class="navbar">
        <view class="navbar-fixed">
            <!-- 状态栏 -->
            <view :style="{height: statusBarHeight+'px'}"></view>
            <!-- 导航栏内容 -->
            <view class="navbar-content" :style="{height:navBarHeight+'px',width:windowWidth+'px'}">
                <view class="navbar-search">
                    <view class="navbar-search_icon">
<uni-icons type="search"></uni-icons></view>
                    <view class="navbar-search_text">uni-app/vue</view>
                </view>
            </view>
        </view>
        <view style="height: 45px;"></view>
    </view>
</template>

<script>
    export default {
        name: "navbar",
        data() {
            return {
                statusBarHeight: 20,
                navBarHeight: 45, //H5
                windowWidth: 375
            };
        },
        created() {
            //获取手机系统信息
            const info = uni.getSystemInfoSync()
            //设置状态栏高度
            this.statusBarHeight = info.statusBarHeight
            this.windowWidth = info.windowWidth
            //h5 app mp-alipay
            // #ifndef H5|| APP-PLUS||MP-ALIPAY
            //获取胶囊的位置
            const menuButtonInfo = uni.getMenuButtonBoundingClientRect()
            console.log(menuButtonInfo);
            //(胶囊底部高度-状态栏的高度)+(胶囊顶部高度-状态栏内的高度)=导航栏的高度
            this.navBarHeight = (menuButtonInfo.bottom - info.statusBarHeight) + (menuButtonInfo.top - info
                .statusBarHeight)+4
            this.windowWidth = menuButtonInfo.left
            // #endif
        }
    }
</script>
使用字体图标
- 在插件市场安装 icons 插件图标库
选项卡数据初始化
- 新建云函数 get_label
'use strict';
//获取数据库的引用
const db = uniCloud.database()
exports.main = async (event, context) => {
    //获取 label 表的数据
    let label = await db.collection('label').get()
    //返回数据给客户端
    return {
        code: 200,
        msg: '数据请求成功',
        data: label.data
    }
};- index.vue
<template>
    <view class="content">
        <navbar></navbar>
        <tab :list="tabList"></tab>
    </view>
</template>

<script>
    export default {
        data() {
            return {
                tabList: []
            }
        },
        onLoad() {
            this.getLabel()
        },
        methods: {
            getLabel() {
                uniCloud.callFunction({
                    name: 'get_label'
                }).then((res) => {
                    const {
                        result
                    } = res
                    this.tabList = result.data
                    console.log(this.tabList);
                })
            }
        }
    }
</script>- tab.vue
<template>
    <view class="tab">
        <scroll-view class="tab-scroll" scroll-x="true">
            <view class="tab-scroll_box">
                <view v-for="(item,index) in list" :key="index" class="tab-scroll_item">{{item.name}}</view>
            </view>
        </scroll-view>
        <view class="tab-icons">
            <uni-icons type="gear" size="26px" color="#666"></uni-icons>
        </view>
    </view>
</template>

<script>
    export default {
        name: "tab",
        props: {
            list: {
                type: Array,
                default () {
                    return []
                }
            }
        },
    }
</script>

<style lang="scss">
    .tab {
        display: flex;
        border-bottom: 1px #f5f5f5 solid;
        background-color: #fff;
        box-sizing: border-box;

        .tab-scroll {
            flex: 1;
            overflow: hidden;
            box-sizing: border-box;

            .tab-scroll_box {
                display: flex;
                align-items: center;
                flex-wrap: nowrap;
                height: 45px;
                box-sizing: border-box;

                .tab-scroll_item {
                    //不让元素进行挤压
                    flex-shrink: 0;
                    padding: 0 10px;
                    color: #333;
                    font-size: 14px;
                }
            }
        }

        .tab-icons {
            position: relative;
            display: flex;
            justify-content: center;
            align-items: center;
            width: 45px;

            // 设置左边的竖线
            &::after {
                content: '';
                position: absolute;
                top: 12px;
                bottom: 12px;
                left: 0;
                width: 1px;
                background-color: #ddd;
            }
        }
    }
</style>
封装数据请求
- main.js
import api from './common/api'
Vue.prototype.$api = api- common->http.js
export default function $http(options) {
    const {
        url,
        data
    } = options
    return new Promise((resolve, reject) => {
        uniCloud.callFunction({
            name: url,
            data
        }).then((res) => {
            if (res.result.code === 200) {
                //.then
                resolve(res.result)
            } else {
                //catch
                reject(res.result)
            }
        }).catch((err) => {
            reject(err)
        })
    })
}- common/api/list.js
import $http from '../http'
export const get_label = (data) => {
    return $http({
        url: 'get_label',
        data
    })
}- common/api/index.js
//批量导出文件
const requireApi = require.context(
    //api 目录的相对路径
    '.',
    //是否查询子目录
    false,
    //查询文件的一个后缀
    /.js$/
)
let module = {}
requireApi.keys().forEach((key, index) => {
    if (key === './index.js') return
    Object.assign(module, requireApi(key))
})
export default module- index.vue
getLabel() {
        this.$api.get_label({
        name: 'get_label'
    }).then((res) => {
        const {
        data
        } = res
        this.tabList = data
        })
    }
选项卡切换选中高亮
- tab.vue
<view v-for="(item,index) in list" :key="index" :class="{active:activeIndex===index}"
  class="tab-scroll_item" @click="clickTab(item,index)">{{item.name}}
</view>
data() {
    return {
    activeIndex: 0
    };
},
methods: {
    clickTab(item, index) {
        this.activeIndex = index
        this.$emit('tab', {
            data: item,
            index: index
        })
    }
}

.tab-scroll_item {
    &.active {
        color: $mk-base-color;
    }
}- index.vue
<tab :list="tabList" @tab="tab"></tab>
methods: {
    tab({
        data,
        index
    }) {
        console.log(data,
        index);
    },
}
基础卡片视图实现
- 内容滚动选项卡不动组件
- list-scroll.vue
<template>
    <view class="scroll">
        <scroll-view class="list-scroll" scroll-y="true">
            <view>
                <slot></slot>
            </view>
        </scroll-view>
    </view>
</template>

<script>
    export default {
        name: "list-scroll",
        data() {
            return {

            };
        }
    }
</script>

<style lang="scss">
    .scroll {
        flex: 1;
        overflow: hidden;
        box-sizing: border-box;

        .list-scroll {
            height: 100%;
            display: flex;
            flex-direction: column;
        }
    }
</style>- index.vue
<list-scroll>
            <list-card v-for="item in 5">{{item}}</list-card>
</list-scroll>- list-card.vue
<template>
    <view>
        <view class="list-card">
            <view class="listcard-image">
                <image src="../../static/logo.png" mode="aspectFill"></image>
            </view>
            <view class="listcard-content">
                <view class="listcard-content_title">
                    <text>uni-app 开发框架 uni-app 开发框架 uni-app 开发框架 uni-app 开发框架 uni-app 开发框架 uni-app 开发框架</text>
                </view>
                <view class="listcard-content_des">
                    <view class="listcard-content_des-label">
                        <view class="listcard-content_des-label-item">前端</view>
                    </view>
                    <view class="listcard-content_des-browse">120 浏览</view>
                </view>
            </view>
        </view>
    </view>
</template>

<script>
    export default {
        name: "list-card",
        data() {
            return {

            };
        }
    }
</script>

<style lang="scss">
    .list-card {
        display: flex;
        padding: 10px;
        margin: 10px;
        border-radius: 5px;
        box-shadow: 0 0 5px 1px rgba($color:#000000, $alpha:0.1);
        box-sizing: border-box;

        .listcard-image {
            width: 60px;
            height: 60px;
            border-radius: 5px;
            overflow: hidden;

            image {
                width: 100%;
                height: 100%;
            }
        }

        .listcard-content {
            display: flex;
            flex-direction: column;
            justify-content: space-between;
            padding-left: 10px;
            width: 100%;

            .listcard-content_title {
                font-size: 14px;
                color: #333;
                font-weight: 400;
                line-height: 1.2;

                //文字溢出隐藏
                text {
                    overflow: hidden;
                    text-overflow: ellipsis;
                    display: -webkit-box;
                    -webkit-line-clamp: 2;
                    -webkit-box-orient: vertical;
                }
            }

            .listcard-content_des {
                display: flex;
                justify-content: space-between;
                font-size: 12px;

                .listcard-content_des-label {
                    display: flex;

                    .listcard-content_des-label-item {
                        padding: 0 5px;
                        margin-right: 5px;
                        border-radius: 15px;
                        color: $mk-base-color;
                        border: 1px $mk-base-color solid;
                    }
                }

                .listcard-content_des-browse {
                    color: #999;
                    line-height: 1.5;
                }
            }
        }
    }
</style>
更多卡片视图实现
- 代码详见 gitee list-card.vue
实现内容切换
- 代码详见 gitee list.vue list-item.vue
选项卡与内容联动 [有点混乱]
内容卡片数据初始化
切换选项卡懒加载数据
list.vue
选项卡最左边的全部显示
- index.vue 中 getLabel()方法.then 加入
    data.unshift({
    name: '全部'
})- 云函数 get_list 中的 index.js
    const {
        name
    } = event
    let matchObj = {}
    if (name !== '全部') {
        matchObj = {
            classify: name
        }
    }

    //聚合: 更精细化的去处理数据 求和 ,分组,指定那些字段
    const list = await db.collection('article').aggregate().match(matchObj).project({
        content: 0
    }).end()
加载过的数据不能再进行数据请求
- list.vue
change(e) {
    const {
        current
    } = e.detail
    //自定义事件: 将组件的内容发送到调用页面
    this.$emit('change', current)
    //当数据不存在或者长度是 0 的情况下,才去请求数据
    if (!this.listCatchData[current] || this.listCatchData[current].length === 0) {
    this.getList(current)
    }
},
上拉加载更多
收藏按钮实现
- 新建云函数 update_like->右键配置运行测试参数->
{
    "user_id": "63088033612f700001787a17",
    "article_id": "63088032e3e39a00012e824e"
}- update_like/index.js
'use strict';
const db = uniCloud.database()
const dbCmd = db.command
exports.main = async (event, context) => {
    const {
        user_id,
        article_id
    } = event
    const userinfo = await db.collection('user').doc(user_id).get()
    const article_id_ids = userinfo.data[0].article_likes_ids
    let dbCmdFuns = null
    if (article_id_ids.includes(article_id)) {
        //删除
        dbCmdFuns = dbCmd.pull(article_id)
    } else {
        dbCmdFuns = dbCmd.addToSet(article_id)
    }
    await db.collection('user').doc(user_id).update({
        article_likes_ids: dbCmdFuns
    })
    //返回数据给客户端
    return {
        code: 200,
        msg: '数据请求成功',
        data: userinfo.data[0]
    }
};
//list-card.vue
<likes :item="item"></likes>- get_list/index.js
const $ = db.command.aggregate
exports.main = async (event, context) => {
const {
        user_id,
    } = event
}
    const userinfo = await db.collection('user').doc(user_id).get()
    const article_likes_ids = userinfo.data[0].article_likes_ids
    const list = await db.collection('article')
        .aggregate()
        //追加字段
        .addFields({
            is_like: $.in(['$_id', article_likes_ids])
})- 在 http.js,使每个接口都默认请求这个 user_id,在之后都会获取一下
    const dataObj = {
        user_id: '63088033612f700001787a17',
        ...data
    }
    uniCloud.callFunction({
            name: url,
            data: dataObj
})- likes.vue
<template>
    <view class="icons" @click.stop="likeTap">
        <uni-icons size="20" color="#f07373" :type="like?'heart-filled':'heart'"></uni-icons>
    </view>
</template>

<script>
    export default {
        props: {
            item: {
                type: Object,
                default () {
                    return {}
                }
            }
        },
        data() {
            return {
                like: false
            };
        },
        watch: {
            item(newVal) {
                this.like = this.item.is_like
            }
        },
        created() {
            this.like = this.item.is_like
        },
        methods: {
            likeTap() {
                this.like = !this.like
                this.setupdateLikes()
            },
            setupdateLikes() {
                uni.showLoading()
                this.$api.update_like({
                    user_id: '63088033612f700001787a17',
                    article_id: this.item._id
                }).then(res => {
                    uni.hideLoading()
                    uni.showToast({
                        title: this.like ? '收藏成功' : '取消收藏',
                        icon: 'none'
                    })
                    console.log(res)
                }).catch(() => {
                    uni.hideLoading()
                })
            }
        }
    }
</script>

<style>
    .icons {
        position: absolute;
        right: 0;
        top: 0;
        display: flex;
        justify-content: center;
        align-items: center;
        width: 20px;
        height: 20px;
    }
</style>
使用 vuex 管理历史记录
- 新建目录 store/index.js
//vuex 状态管理
import Vue from 'vue'
import Vuex from 'vuex'

Vue.use(Vuex)
const store = new Vuex.Store({
    //数据源
    state: {
        historyLists: []
    },
    mutations: {
        SET_HISTORY_LISTS(state, history) {
            state.historyLists = history
        }
    },
    actions: {
        set_history({
            commit,
            state
        }, history) {
            let list = state.historyLists
            list.unshift(history)
            //调用 mutations 的方法
            commit('SET_HISTORY_LISTS', list)
        }
    }
})

export default store- main.js
import store from './store'
const app = new Vue({
    store
})- get_search/index.js
'use strict';
// 获取数据库的引用
const db = uniCloud.database()
const $ = db.command.aggregate
exports.main = async (event, context) => {
    const {
        value,
        user_id,
    } = event

    const userinfo = await db.collection('user').doc(user_id).get()
    const article_likes_ids = userinfo.data[0].article_likes_ids
    // 聚合 : 更精细化的去处理数据 求和 、分组、指定那些字段

    const list = await db.collection('article')
        .aggregate()
        // 追加字段
        .addFields({
            is_like: $.in(['$_id', article_likes_ids])
        })
        .project({
            content: 0
        })
        .match({
            title: new RegExp(value)
        })
        .end()

    //返回数据给客户端
    return {
        code: 200,
        msg: '数据请求成功',
        data: list.data
    }
};
搜索历史数据持久化
- 清空 store/index.js
mutations: {
    CLEAR_HISTORY(state) {
        state.historyLists = []
    }
},
actions: {
    clearHistory({commit}) {
        commit('CLEAR_HISTORY')
    }
}- home-search.vue
clear() {
    this.$store.dispatch('clearHistory')
    uni.showToast({
        title: "清空完成"
    })
},- 历史持久化 store/index.js
    //数据源
    state: {
        //同步
        historyLists: uni.getStorageSync("__history")||[]
    },
    actions: {
        set_history({
            commit,
            state
        }, history) {
            let list = state.historyLists
            list.unshift(history)
            uni.setStorageSync('__history', list)
            //调用 mutations 的方法
            commit('SET_HISTORY_LISTS', list)
        },
        clearHistory({
            commit
        }) {
            uni.removeStorageSync('__history')
            commit('CLEAR_HISTORY')
        }
    }
标签管理页布局样式
<template>
    <view class="label">
        <view class="label-box">
            <view class="label-header">
                <view class="label-title">我的标签</view>
                <view class="label-edit">编辑</view>
            </view>
            <view class="label-content">
                <view v-for="item in 10" class="label-content_item">{{item}}标签
                    <uni-icons class="icons-close" type="clear" size="20" color="red"></uni-icons>
                </view>
            </view>
        </view>
        <view class="label-box">
            <view class="label-header">
                <view class="label-title">标签推荐</view>
            </view>
            <view class="label-content">
                <view v-for="item in 10" class="label-content_item">{{item}}标签</view>
            </view>
        </view>
    </view>
</template>

<script>
    export default {
        data() {
            return {

            }
        },
        methods: {

        }
    }
</script>

<style lang="scss">
    page {
        background-color: #f5f5f5;
    }

    .label {
        .label-box {
            background-color: #fff;
            margin-bottom: 10px;

            .label-header {
                display: flex;
                justify-content: space-between;
                padding: 10px 15px;
                font-size: 14px;
                color: #666;
                border-bottom: 1px solid #f5f5f5;

                .label-edit {
                    color: #30b33a;
                    font-weight: bold;
                }
            }

            .label-content {
                display: flex;
                flex-wrap: wrap;
                padding: 15px;
                padding-top: 0;

                .label-content_item {
                    position: relative;
                    padding: 2px 5px;
                    margin-top: 12px;
                    margin-right: 10px;
                    border-radius: 5px;
                    border: 1px #666 solid;
                    font-size: 14px;
                    color: #666;

                    .icons-close {
                        position: absolute;
                        right: -8px;
                        top: -8px;
                        background-color: #fff;
                        border-radius: 50%;
                    }
                }
            }
        }
    }
</style>
标签页数据处理
- 云函数: get_label/index.js
'use strict';
//获取数据库的引用
const db = uniCloud.database()
const $ = db.command.aggregate
exports.main = async (event, context) => {
    const {
        user_id,
        type
    } = event
    let matchObj = {}
    if (type !== 'all') {
        matchObj = {
            current: true
        }
    }
    let userinfo = await db.collection('user').doc(user_id).get()
    userinfo = userinfo.data[0]
    //获取 label 表的数据
    let label = await db.collection('label').aggregate()
        .addFields({
            current: $.in(['$_id', $.ifNull([userinfo.label_ids, []])])
        }).match(matchObj)
        .end()
    //返回数据给客户端
    return {
        code: 200,
        msg: '数据请求成功',
        data: label.data
    }
};
编辑标签页
保存标签页数据
- 新建云函数,update_label/index.js
'use strict';
const db = uniCloud.database()
const $ = db.command.aggregate
exports.main = async (event, context) => {
    const {
        user_id,
        label = []
    } = event
    await db.collection('user').doc(user_id).update({
        label_ids: label
    })
    //返回数据给客户端
    return {
        code: 200,
        msg: '数据更新成功'
    }
};
使用自定义事件同步数据
详见 gitee.com /pages/home-label.vue
详情页页面展示
内容预加载
- list-card.vue
open() {
    const item = this.item
    this.$emit('click', item)
    const params = {
        _id: item._id,
        title: item.title,
        author: item.author,
        create_time: item.create_time,
        thumbs_up_count: item.thumbs_up_count,
        browse_count: item.browse_count
    }
    console.log(params)
    //传参注意长度
    uni.navigateTo({
        url: '/pages/home-detail/home-detail?params=' + JSON.stringify(params)
    })
}- home-detail.vue
export default {
    data() {
        return {
            formData: {}
        }
    },
    onLoad(query) {
        this.formData = JSON.parse(query.params)
    },
}
详情页面数据初始化
- 新建云函数 get_detail
'use strict';
// 获取数据库引用
const db = uniCloud.database()
const $ = db.command.aggregate
exports.main = async (event, context) => {

    const {
        user_id,
        article_id
    } = event

    const userinfo = await db.collection('user').doc(user_id).get()
    const user = userinfo.data[0]
    const list = await db.collection('article')
        .aggregate()
        .addFields({
            // 是否关注作者
            is_author_like: $.in(['$author.id', user.author_likes_ids]),
            // 是否收藏文章
            is_like: $.in(['$_id', user.article_likes_ids]),
            // 是否点赞
            is_thumbs_up: $.in(['$_id', user.thumbs_up_article_ids])
        })
        .match({
            _id: article_id
        })
        .project({
            coments: 0
        })
        .end()

    //返回数据给客户端
    return {
        code: 200,
        msg: '数据请求成功',
        data: list.data[0]
    }
};- home-detail.vue
getDetail() {
    this.$api.get_detail({
        article_id: this.formData._id
    }).then((res) => {
        const {
        data
        } = res
        this.formData = data
    })
}
富文本渲染
- 在插件市场搜索富文本解析->引入 HBuilder
<u-parse :content="formData.content" :noData="noData"></u-parse>

data() {
    return {
        noData: '<p style="text-align:center;color:#666">详情加载中...</p>'
    }
},
发布窗口展示
- home-detail.vue
<view class="popup-content">
            <textarea class="popup-textarea" v-model="commentsValue" maxlength="200" fixed
                placeholder="请输入评论内容"></textarea>
            <view class="popup-count">{{commentsValue.length}}/200</view>
</view>
data() {
return {
formData: {},
noData: '<p style="text-align:center;color:#666">详情加载中...</p>',
//输入框的值
commentsValue: ''
}
},
onLoad(query) {
this.formData = JSON.parse(query.params)
this.getDetail()
},
methods: {
//打开评论发布窗口
openComment() {
this.$refs.popup.open()
},
//关闭弹窗
close() {
this.$refs.popup.close()
},
//发布
submit() {
console.log('发布');
this.$refs.popup.close()
},评论内容实现
-
新建云函数 update_comment
-
从云数据库获取评论内容,新建云函数 get_comments
回复评论
子回复的回复
- home-detail
- comments-box
- update_comment
关注作者
- 新建云函数 update_author
- 点击关注之后,要知道是否已经关注(要从这看云函数 get_detail),从而获取 is_author_like[是否关注作者]
- home-detail.vue
<button class="detail-header_button" type="default"
    @click="follow(formData.author.id)">{{formData.is_author_like?'取消关注':'关注'}}</button>

follow(author_id) {
    console.log('关注');
    this.setUpdateAuthor(author_id)
},
//请求关注作者
setUpdateAuthor(author_id) {
    uni.showLoading()
        this.$api.update_author({
        author_id
    }).then(res => {
        uni.hideLoading()
        this.formData.is_author_like = !this.formData.is_author_like
        uni.showToast({
            title: this.formData.is_author_like ? '关注作者成功' : '取消关注作者',
            icon: 'none'
        })
    })
}
文章的收藏与点赞
-
收藏类似关注
-
点赞
新建云函数 update_thumbsup -
详情页收藏文章,通知首页收藏
评论列表
-
detail-comments
-
时间戳 utils/index.js
//时间格式化
export const parseTime = (time) => {
    console.log(time);
    const format = '{y}-{m}-{d} {h}:{i}:{s}'
    let date = null
    if (typeof time === 'string') {
        time = parseInt(time)
    }
    date = new Date(time)
    const formatObj = {
        y: date.getFullYear(),
        m: date.getMonth() + 1,
        d: date.getDate(),
        h: date.getHours(),
        i: date.getMinutes(),
        s: date.getSeconds()
    }
    const strTime = format.replace(/{(y|m|d|h|i|s)+}/g, (result, key) => {
        let value = formatObj[key]
        if (result.length > 0 && value < 10) {
            value = '0' + value
        }
        return value
    })
    return strTime
}
回复[作业]???
关注页导航栏实现
- follow.vue
收藏文章内容实现
- 新建云函数 get_follow
收藏与首页内容关联
-
follow.vue : uni.$on('update_article')
-
home-detail.vue :
uni.$emit('update_article', 'follow') -
list.vue
uni.$on('update_article', (e) => {
                console.log(e);
                if (e === 'follow') {
                    this.listCatchData = {}
                    this.load = {}
                    this.getList(this.activeIndex)
                }
})- list-card.vue
<likes :types="types" :item="item"></likes>
props:{
types: {
            type: String,
            default: ''
        }
    }
关注作者页面实现
- 新建组件 list-author
- follow.vue
- 新建云函数 get_author
- home-detail.vue
setUpdateAuthor(author_id) {
}).then(res => {
uni.$emit('update_author')
})- follow.vue
onLoad() {
    //首页与关注作者页面同步
    uni.$on('update_author', () => {
        this.getAuthor()
    })
}
个人中心页面实现
- 新建云函数 get_user/index.js
- App.vue
- store/index.js
- common/http.js
import store from '../store/index.js'
const dataObj = {
        user_id: store.state.userinfo._id,
        ...data
    }
我的文章实现
- 新建页面 my-article.vue
- 新建云函数 get_my_article
作业,没有文章时显示没有文章,参考 follow 的 no-data????
意见反馈页面实现
- /pages/feedback.vue
- 新建云函数 update_feedback
适配微信开发者工具
-
视频中出现的问题,loading 编译到在 list-card 上面
![]()

-
list-item.vue
    <list-scroll class="list-scroll" @loadmore="loadmore">
        <view>
            <!--运行到微信开发者工具上:出现的问题,外层加一个 view, 原因: list-card 最开始是没有渲染的,通过数据插入之后才开始去渲染内容 -->
            <list-card mode="base" :item="item" v-for="item in list" :key="item._id"></list-card>
        </view>

        <!-- 数据少于 pageSize 时,不显示 loadmore -->
        <!-- 左右翻页时,加载提示消失了  uni-load-more 是直接显示在页面里面的,肯定比 list-card 早-->
        <uni-load-more v-if="list.length===0||list.length> 7" iconType="snow" :status="load.loading">
        </uni-load-more>
    </list-scroll>
右滑切换内容时,显示 '没有更多数据了'

- 在 list-item 中加 ||'loading'
    <uni-load-more v-if="list.length===0||list.length> 7" iconType="snow" :status="load.loading||'loading'">
    </uni-load-more>
在微信开发者工具清除缓存之后,报错:请求 get_label 云函数错误:docId 必须为字符串或数字
- pages/tabbar/index/index.vue
    import {
        mapState
    } from 'vuex'

    export default {
        computed: {
            ...mapState(['userinfo'])
        },
            watch: {
            userinfo(newVal) {
                this.getLabel()
            }
        },
        onLoad() {
            uni.$on('labelChange', (res) => {
                this.tabList = []
                this.tabIndex = 0
                this.activeIndex = 0
                this.getLabel()
            })
        }
    }
适配支付宝小程序
- 打开项目目录:
- E:\Project\uni-app-project\imooc-news\unpackage\dist\dev\mp-alipay
头部

- page.json 中 #f07373
"globalStyle": {
        "navigationBarTextStyle": "black",
        "navigationBarTitleText": "uni-app",
        "navigationBarBackgroundColor": "#f07373",
        "backgroundColor": "#F8F8F8"
},- navbar.vue
<!-- #ifndef MP-ALIPAY -->
    <view :style="{height: statusBarHeight+'px'}"></view>
<!-- #endif -->- 导航栏下面会多节: 给自定义导航栏加了个导航栏高度占位元素
- 给占位符减去这个高度

created() {
// #ifdef MP-ALIPAY
    this.statusBarHeight = 0
// #endif
}
视频中关注页面没显示内容,我这有
- follow.vue
.follow {
//视频中运行到支付宝,没有内容,他采用注释这
// height: 100%;
}
详情页关注按钮效果显示不正确

- home-detail.vue
.detail-header_button {
    padding: 0 15px;
    flex-shrink: 0;
    height: 30px;
    line-height: 30px;
    border-radius: 5px;
    font-size: 12px;
    color: #fff;
    background-color: $mk-base-color;
}


