代码仓库地址: https://gitee.com/lin-lin-DJ/second-elementplus
搭建 vite 项目并配置路由和 elementplus
- npm init vite@latest second-elementplus -- --template vue-ts
- npm i -S vue-router@next element-plus
全局注册图标
- npm install @element-plus/icons
- 在此想要把 vue3 图标的驼峰命名法 改造成 el-icon-xxx 使用图标组件, 所以我们先编写一个工具类
//把驼峰转换成横杠链接
export const toLine=(value:string )=>{
return value.replace(/(A-Z)g/,'-$1').toLocaleLowerCase()
}- main.ts
import ElementPlus from 'element-plus'
import 'element-plus/dist/index.css'
import * as Icons from '@element-plus/icons'
import {toLine} from "./utils";

const app = createApp(App)

//全局注册图标 牺牲一点性能
for (let i in Icons){
    //注册全部组件
    app.component(`el-icon-${toLine(i)}`, (Icons as any)[i])
}

app.use(ElementPlus)
app.mount('#app')- 即可在 vue 组件里面使用 el-icon-xxx 使用图标
<el-icon-edit/>伸缩菜单功能
- 利用 elementplus 中 el-menu 的 collapse 属性和 v-if 判断收缩/展开图标, 实现伸缩菜单功能
巧用两次 watch 控制弹框的显示与隐藏
- 存在问题: 点两次按钮才出现弹窗?
<template>
  <el-button @click="handleClick" type="primary">
    <slot></slot>
  </el-button>
  <el-dialog :modelValue="dialogVisible" :title="title">111</el-dialog>
</template>

<script lang="ts" setup>
import {ref, watch} from "vue";

const props = defineProps<{
  //弹出框的标题
  title: string,
  //控制弹出框的显示与隐藏
  visible: boolean,
}>()
let emits = defineEmits(['update:visible'])
//拷贝一份父组件传递过来的 visible 值
let dialogVisible = ref<boolean>(props.visible)
const handleClick = () => {
  emits('update:visible', !props.visible)
}
// 监听父组件传递过来的值, 只能监听第一次的变化
watch(() => props.visible, (newValue) => {
  dialogVisible.value=newValue
})
//监听组件内部的 dialogVisible 变化
watch(() => dialogVisible.value, (newValue) => {
  emits('update:visible', newValue)
})
</script>- 父组件调用
<template>
<choose-icon title="选择图标" v-model:visible="visible">选择图标
</choose-icon>
</template>

<script lang="ts" setup>
import ChooseIcon from '../../components/chooseIcon/src/index.vue'
import {ref} from "vue";
const visible = ref<boolean>(false)
</script>
巧用 component 动态组件显示所有的图标
<el-dialog :modelValue="dialogVisible" :title="title">
    <div class="container">
      <div class="item" v-for="(item,index) in Object.keys(ElIcons)"  :key="index">
        <div>
          <component :is="`el-icon-${toLine(item)}`"></component>
        </div>
        <div>{{item}}</div>
      </div>
    </div>
  </el-dialog>
<style scoped lang="less">
.container{
display: flex;
align-items: center;
flex-wrap: wrap;
.item{
width: 20%;
display: flex;
flex-direction: column;
justify-content: center;
align-items: center;
margin-bottom: 15px;
height: 70px;
svg{
width: 2em;
height: 2em;
}
}
}
</style>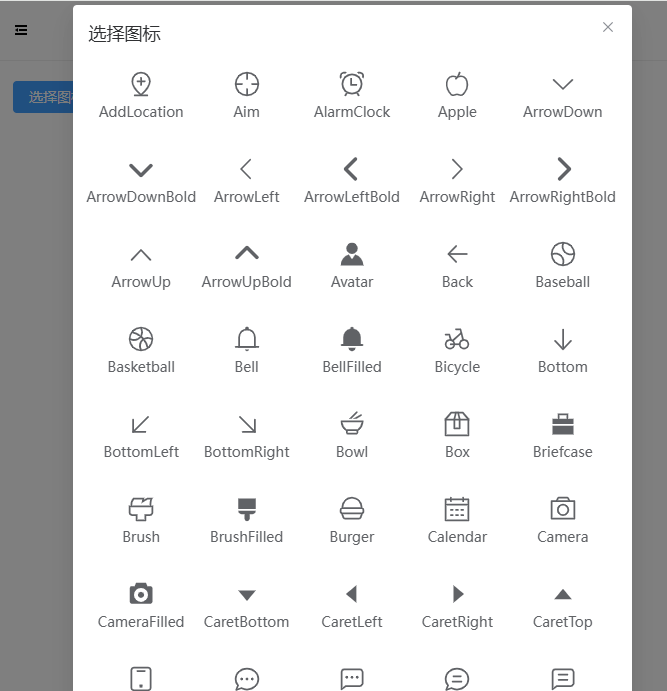
通过自定义 hooks 函数实现复制功能
- hooks/useCopy/index.ts
import {ElMessage} from "element-plus";

export const useCopy=(text:string)=>{
    //创建输入框
    let input=document.createElement('input')
    //给输入框 value 赋值
    input.value=text
    //追加到 body
    document.body.appendChild(input)
    //选择输入框的操作
    input.select()
    //执行复制操作
    document.execCommand('Copy')
    //删除加入的输入框
    document.body.removeChild(input)
    //提示用户
    ElMessage.success('复制成功')
}
//点击图标
const clickItem = (item:string) => {
let text=`<el-icon-${toLine(item)}/>`
useCopy(text)
dialogVisible.value=false
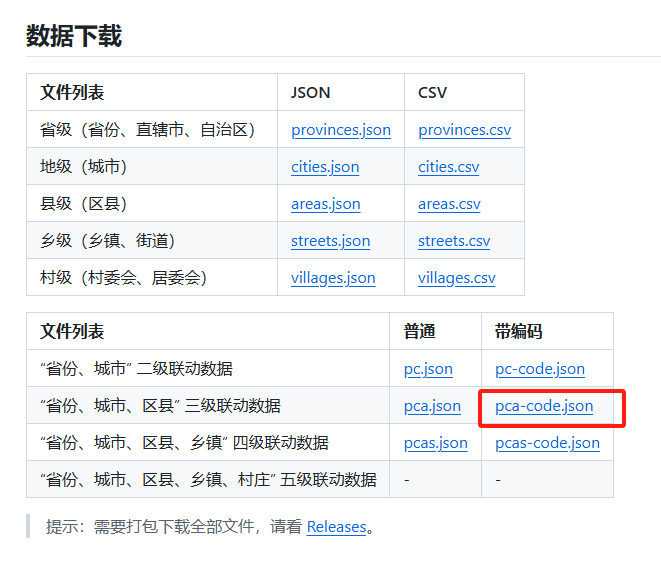
}省市区选择组件
- 从 github 中获取省市区 json 数据
https://github.com/modood/Administrative-divisions-of-China
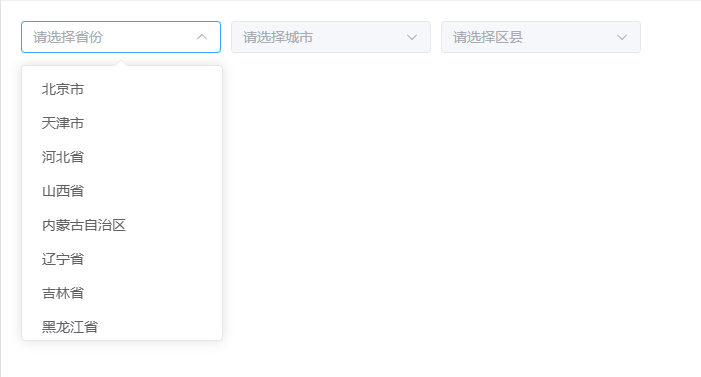
- 演示效果
- 组件代码
<template>
  <div>
    <el-select placeholder="请选择省份" v-model="province" clearable>
      <el-option v-for="item in areas" :key="item.code" :value="item.code" :label="item.name"></el-option>
    </el-select>
    <el-select :disabled="!province" style="margin: 0 10px" placeholder="请选择城市" v-model="city" clearable>
      <el-option v-for="item in selectCity" :key="item.code" :value="item.code" :label="item.name"></el-option>
    </el-select>
    <el-select :disabled="!province||!city" placeholder="请选择区县" v-model="area" clearable>
      <el-option v-for="item in selectArea" :key="item.code" :value="item.code" :label="item.name"></el-option>
    </el-select>
  </div>
</template>

<script lang="ts" setup>
import {watch, ref} from "vue";
import allAreas from '../lib/pca-code.json'

export interface AreaItem{
  name:string,
  code:string,
  children?:AreaItem[]
}

export interface Data{
  name:string,
  code:string,
}

const province = ref<string>('')//省份
const city = ref<string>('')//城市
const area = ref<string>('')//区域
const areas = ref(allAreas)//所有省市区数据
//todo 用 computed 会报错, 选择 省市区之后, 再选择省份会报错 Uncaught (in promise) TypeError: Cannot read properties of undefined (reading 'children')
//城市下拉框的所有的值
const selectCity = ref<AreaItem[]>([])
//区域下拉框的所有的值
const selectArea = ref<AreaItem[]>([])
// const selectCity = computed(() => {
//   if (!province.value) {
//     return []
//   } else {
//     return areas.value.find(item => item.code === province.value)!.children
//   }
// })

//分发事件给父组件
const emits = defineEmits(['change'])

//监听选择省份
watch(() => province.value, (newValue) => {
  if (newValue) {
    //加 ! 是指一定是有值的
    selectCity.value = areas.value.find(item => item.code === newValue)!.children!
  }
  city.value=''
  area.value=''
})
//监听选择城市
watch(() => city.value, (newValue) => {
  if (newValue) {
    selectArea.value = selectCity.value.find(item => item.code === newValue)!.children!
  }
  area.value=''
})
//监听选择区域
watch(() => area.value, (newValue) => {
 if(newValue){
   let provinceData:Data={
     code:province.value,
     name:province.value&&allAreas.find(item=>item.code=== province.value)!.name
   }
   let cityData:Data={
     code:city.value,
     name: city.value&&selectCity.value.find(item=>item.code=== city.value)!.name
   }
   let areaData:Data={
     code:newValue,
     name:newValue&&selectArea.value.find(item=>item.code=== newValue)!.name
   }
   emits('change',{
     province:provinceData,
     city:cityData,
     area:areaData
   })
 }
})
</script>

<style scoped>
.el-select {
  width: 200px;
}
</style>- 父组件调用
<template>
<choose-area @change="changeArea"/>
</template>

<script setup lang="ts">
import ChooseArea from '../../components/chooseArea/src/index.vue'
const changeArea=(val)=>{
  console.log(val)
}
</script>
利用 app.use 特性全局注册组件
-
- 在 components/chooseArea 组件里面创建 index.ts
import {App} from 'vue'
import chooseArea from './src/index.vue'

//让这个组件可以通过 use 的形式使用
export default {
  install(app: App) {
    app.component('choose-area', chooseArea)
  }
}- 2.在 components 里面创建 index.ts
import {App} from 'vue'
import chooseArea from './chooseArea'
import chooseIcon from './chooseIcon'

const components=[
    chooseIcon,
    chooseArea
]
export default {
    install(app: App) {
        components.map(item=>{
            app.use(item)
        })
    }
}- 3.在 main.ts 中全局引入组件
import App from './App.vue'
import mUI from './components'//全局
//import chooseArea from './components/chooseArea'//按需引入

const app = createApp(App)
app.use(mUI)
//.use(chooseArea)- 4.在 views 页面中就不用引入组件了
通知菜单
- 想实现的效果
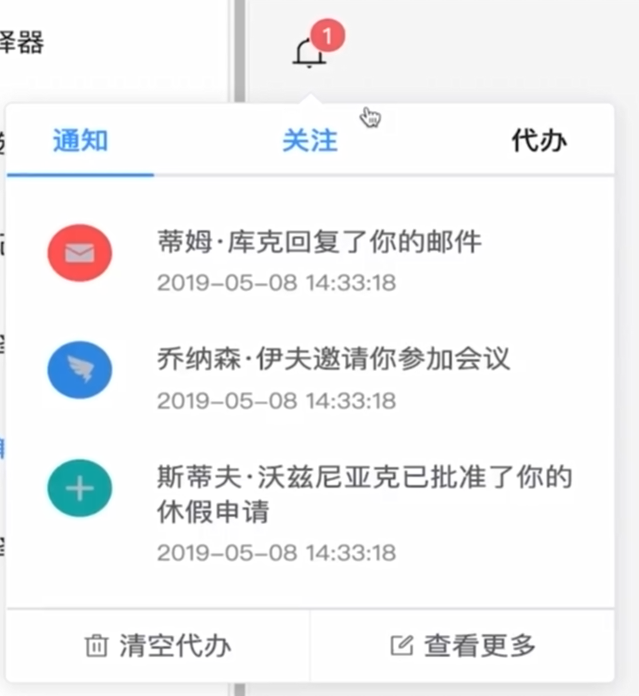
- 通知图标封装
<template>
  <el-badge :value="value" :max="max" :is-dot="isDot">
    <component :is="`el-icon-${toLine(icon)}`"></component>
  </el-badge>
</template>

<script lang="ts" setup>
import {toLine} from "../../../utils";

const props = defineProps({
  //显示的图标
  icon: {
    type: String,
    default: 'Bell'
  },
  //通知数量
  value: {
    type: [String, Number],
    default: ''
  },
  //最大值
  max: {
    type: Number
  },
  //是否显示小圆点
  isDot: {
    type: Boolean,
    default: false
  }
})
</script>
使用 tsx 实现无限层级菜单
-
npm i -D @vitejs/plugin-vue-jsx
-
vite.config.ts
import { defineConfig } from 'vite'
import vue from '@vitejs/plugin-vue'
import vueJsx from '@vitejs/plugin-vue-jsx'
export default defineConfig({
  plugins: [vue(),vueJsx()],
  server:{
    port:8080
  }
})
- menu.tsx
import {defineComponent, PropType, useAttrs} from "vue";
import {MenuItem} from "./types";
import * as Icons from '@element-plus/icons'
import './styles/index.css'
export default defineComponent({
    props: {
        //导航菜单的数据
        data: {
            type: Array as PropType<MenuItem[]>,
            required: true
        },
        //默认选中的菜单
        defaultActive: {
            type: String,
            default: ''
        },
        //是否是路由模式
        router: {
            type: Boolean,
            default: false
        }
    },
    setup(props, ctx) {
        //封装一个渲染无限层级菜单的方法
        //函数会返回一段 jsx 的代码
        let renderMenu = (data: MenuItem[]) => {
            return data.map((item: MenuItem) => {
                //每个菜单的图标
                item.i = (Icons as any)[item.icon!]
                //处理 sub-menu 的插槽
                let slots = {
                    title: () => {
                        return <>
                            <item.i/>
                            <span>{item.name}</span>
                        </>
                    }
                }
                //递归渲染 children
                if (item.children && item.children.length) {
                    return (
                        <el-sub-menu index={item.index} v-slots={slots}>
                            {renderMenu(item.children)}
                        </el-sub-menu>
                    )
                }
                //正常渲染普通的菜单
                return (
                    <el-menu-item index={item.index}>
                        <item.i/>
                        <span>{item.name}</span>
                    </el-menu-item>
                )
            })
        }
        let attrs= useAttrs()
        return ()=> {
           return (
                <el-menu default-active={props.defaultActive} router={props.router} {...attrs}>
                    {renderMenu(props.data)}
                </el-menu>
            )
        }
    }
})
进度条组件
- 完成进度条动态加载效果
- progress/src/index.vue
<template>
  <div>
    <el-progress v-bind="$attrs" :percentage="p"></el-progress>
  </div>
</template>

<script lang="ts" setup>

import {onMounted, ref} from "vue";

const props = defineProps({
  //进度条进度
  percentage: {
    type: Number,
    default: 60
  },
  //进度条是否有动画效果
  isAnimation: {
    type: Boolean,
    default: false
  },
  //动画时长(毫秒)
  time: {
    type: Number,
    default: 3000
  },
})
let p = ref(0)
onMounted(() => {
  if (props.isAnimation) {

    let t = Math.ceil(props.time / props.percentage)
    let timer = setInterval(() => {
      p.value += 1
      if (p.value > props.percentage) {
        p.value = props.percentage
        clearInterval(timer)
      }
    }, t)
  } else {
    p.value = props.percentage
  }
})
</script>
城市选择
- 点击字母跳转到对应位置
- 绑定 id, 使用 dom 的原生方法
- 扩展: 小程序里面富文本如何跳转到指定文字的区域
let el= document.getElementById(item)
if(el) el.scrollIntoView()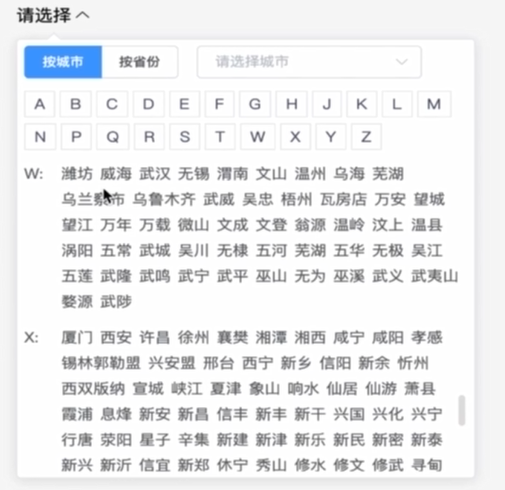
表单组件
功能
1.可配置型表单,通过 json 对象的方式自动生成表单
2.具备更完善的功能,表单验证,动态删减表单,集成第三方的插件,
3.用法简单,扩展性强,可维护性强
4.能够用在更多的场景,比如弹框嵌套表单
准备工作
1.分析element-plus表单能够在哪些方面做优化
2.完善我们封装表单的类型,支持 ts
3.封装的表单要具备element-plus原表单的所有功能
4.集成第三方的插件: markdown 编辑器, 富文本编辑器...
注意
- npm i -S lodash @types/lodash
- 在 Vue 组件中处理引用类型(如对象和数组)时,使用深拷贝可以避免意外的副作用。深拷贝会创建一个新的对象或数组,并且不会与原始数据共享引用,这样可以确保数据的独立性。


